
Table of Contents
Introduction
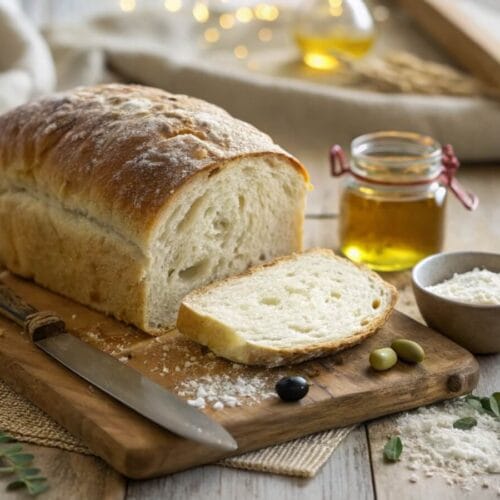
There’s nothing quite like the aroma of freshly baked bread wafting through your home, especially when it’s a loaf of soft sourdough sandwich bread. This staple combines the tangy flavor of traditional sourdough with the soft, yielding texture perfect for sandwiches and toast. Making your bread might seem daunting, but with this beginner-friendly guide, you’ll find it surprisingly simple and incredibly rewarding.
Homemade bread not only tastes better, but it also allows you to control what goes into your food, avoiding the preservatives and additives found in store-bought varieties. Whether you’re baking for a special occasion or to add a little warmth to your weekend, this sourdough sandwich bread recipe will become a cherished part of your culinary repertoire. Plus, the techniques you’ll learn here will serve you through all seasons, with ideas for adding seasonal ingredients to give each loaf a unique twist.
Chef’s Tips for Perfecting Soft Sourdough Sandwich Bread
To ensure your sourdough sandwich bread recipe turns out perfectly every time, consider these expert tips:
- Creating Steam: Achieve that bakery-style crust by creating steam inside your oven. You can do this by placing a cast-iron pan filled with boiling water on the bottom rack of your oven when you put the bread in to bake. This steam will help the crust develop well while keeping the inside soft and airy.
- Temperature Monitoring: The temperature of the water used to mix with the starter should be around 80°F. Use a kitchen thermometer to measure this, as too hot or too cold can deactivate your yeast.
- Scoring Techniques: Scoring the top of your dough not only enhances the bread’s appearance but also helps it expand correctly during baking. Use a sharp lame or a very sharp knife to make a few shallow cuts on top of the loaf right before baking.
Creative Variations and Substitutions for Sourdough Sandwich Bread
Adapting the sourdough sandwich bread recipe to suit different tastes and dietary needs can provide a wide variety of bread experiences:
- Fat Variations: While olive oil is used for its flavor and health benefits, you can also experiment with other oils like avocado oil for a different taste or melted coconut oil for a subtly sweet undertone.
- Flour Options: While traditional recipes use all-purpose flour, experimenting with a mix of flour can enhance your bread’s flavor and texture. Try substituting half of the all-purpose flour with bread flour for a chewier texture, or use a portion of whole wheat flour for a nuttier, more nutritious loaf.
- Vegan Adaptations: To make your sourdough sandwich bread recipe vegan, replace the honey with an equal amount of maple syrup or agave syrup. This will maintain the sweetness needed to feed the yeast while keeping the sourdough sandwich bread recipe plant-based.
How to Store and Preserve Sourdough Sandwich Bread for Freshness
Proper storage is key to maintaining the freshness and quality of your sourdough sandwich bread recipe :
- Freezing for Longevity: Sourdough bread freezes exceptionally well. Slice the bread once it is completely cooled, wrap each slice in plastic wrap, and place them in a freezer-safe bag. The slices can be toasted straight from frozen for a convenient and quick option.
- At Room Temperature: Wrap the cooled loaf in a clean kitchen towel or place it in a paper bag to keep the crust crispy. This can be preserved in such a manner for a maximum of three days.
Best Pairings for Your Homemade Sourdough Sandwich Bread

This versatile sourdough sandwich bread recipe complements a variety of meals and ingredients:
- For Dinner: Serve alongside a creamy tomato soup or a robust beef stew to soak up all the delicious flavors with your freshly baked bread.
- For Breakfast: Toast a slice and top it with avocado, an over-easy egg, and a sprinkle of salt and pepper for a hearty start to the day.
- For Lunch: Use the sourdough sandwich bread recipe to craft the ultimate sandwich with layers of your favorite deli meats, cheeses, fresh lettuce, tomatoes, and a swipe of mustard.
Sourdough Sandwich Bread FAQs: Common Questions Answered
How can I ensure my sourdough bread is soft and not too crusty? Achieving a softer crust on your sourdough bread involves a simple trick: brush the top of the freshly baked loaf with melted butter. This not only adds a delightful richness but also softens the crust, making it perfect for sandwiches or simply enjoying with a spread of jam.
What should I do if my sourdough bread didn’t rise as much as expected? Suppose your sourdough bread hasn’t risen as expected. In that case, it’s important to check a few key elements: Ensure that your sourdough starter is very active and bubbly before you begin mixing your dough. Room temperature can significantly impact the rise of your dough; if it’s too cold, consider finding a warmer spot or extending the rise time. Additionally, remember to add salt to the dough after the initial mix to avoid inhibiting the yeast’s activity too early.
Is it possible to substitute whole wheat flour in this sourdough sandwich bread recipe? Yes, you can incorporate whole wheat flour into your sourdough sandwich bread recipe for added flavor and nutrition. For best results, replace up to 50% of the all-purpose flour with whole wheat flour. Keep in mind that whole wheat flour absorbs more moisture, so you might need to adjust the hydration of your dough slightly by adding more water.
How do I achieve the perfect crust on my sourdough sandwich bread recipe ? For those who love a crispy crust, creating steam in your oven is the key. Place a metal baking pan on the lowest rack of your oven while it preheats. Right before placing the bread in the oven, pour a cup of hot water into the pan to generate steam. This will help develop a beautiful, crispy crust while keeping the interior of the bread soft and airy.
Is sourdough bread healthier than regular bread? Sourdough bread is often considered healthier than regular bread due to its natural fermentation process, which can make it easier to digest. The fermentation process helps break down gluten and phytates, which can improve nutrient absorption and digestibility. Additionally, sourdough typically has a lower glycemic index, which may help maintain stable blood sugar levels.
How long can I store homemade sourdough bread? Homemade sourdough bread can be kept at room temperature, wrapped in a cloth or paper bag, for up to 3 days. For longer storage, slice the bread once it is completely cool, wrap each slice individually, and freeze them. You can then toast the slices directly from frozen for convenient and quick enjoyment.
What are some imaginative approaches to utilizing sourdough bread? Sourdough bread is incredibly versatile. Beyond making traditional sandwiches, try using it for French toast, as a base for bruschetta, or tear it into chunks for a rustic panzanella salad. It also makes excellent croutons for soups and salads or can be ground into breadcrumbs for use in recipes.
9-Step Sourdough Sandwich Bread
Ingredients
- 240 g Warm water About 80° F
- 110 g Active sourdough starter
- 20 g Olive oil
- 20 g Raw honey
- 415 g Unbleached all-purpose flour
- 10 g Salt
Instructions
- Starter Activation: Begin by activating your sourdough starter. In a large mixing bowl, gently combine 240 grams of warm water (approximately 80 °F) with 110 grams of active sourdough starter. Stir until the starter is fully dissolved in the water, ensuring no clumps remain. This step is crucial as it revives the yeast in the starter, setting the stage for a successful rise.
- Mixing the Ingredients: Incorporate 20 grams of extra virgin olive oil and an equal amount of unprocessed honey into the blend. These ingredients add moisture and a hint of sweetness to the bread, enhancing the flavor. Combine the ingredients thoroughly until all components are evenly blended. Slowly add 415 grams of unbleached all-purpose flour along with 10 grams of kosher salt to the liquid mixture. Stir with a strong wooden spoon or your hands until all ingredients are combined and a sticky, shaggy dough forms. Make sure all the flour is thoroughly mixed with liquid.
- Initial Dough Rest: Cover the bowl with a damp cloth to prevent the dough from drying out, and allow it to rest for 30 minutes. This resting period lets the flour fully absorb the water, which is essential for gluten development.
- Stretch and Fold Kneading: Perform the stretch and fold technique directly in the bowl: gently grasp one side of the dough, stretch it upwards, and fold it over itself. Rotate the bowl a quarter turn and repeat this process until all sides have been stretched and folded. Repeat this folding process every 30 minutes for about 2 hours. This method builds the dough's structure without traditional kneading.
- Bulk Fermentation: After the final stretch and fold, cover the bowl tightly with plastic wrap or a reusable cover and let it rise at room temperature for about 4-5 hours. The dough should double in size and show visible bubbles, indicating active fermentation.
- Shaping the Loaf: Sprinkle a thin layer of flour on your work area and place the dough onto it. Carefully form the dough into a rectangular shape, taking care not to press out too much air. Roll the dough tightly from the short end, sealing the seam and ends by pinching them.
- Second Proofing: Place the shaped dough seam-side down in a greased 9×4 inch loaf pan. Cover the pan lightly with a damp towel or plastic wrap, and let it proof for about 1-2 hours, or until the dough has risen about 1 inch above the top of the pan.
- Baking: Preheat your oven to 375°F. Once the oven is hot, place the loaf pan on the middle rack and bake for 45 minutes, or until the crust is golden brown and the loaf sounds hollow when tapped on the bottom.
- Cooling: Remove the bread from the oven and allow it to cool in the pan for about 10 minutes before transferring it to a wire rack to cool completely. This helps the crust set and makes slicing easier.
Notes
- Calories per serving: 175 calories per slice. (approximately 50g per slice)
- Difficulty: Medium
- Dietary Tags: Vegetarian
- Nutritional Info per serving: 1g fat, 36g carbs, 5g protein, 190 mg sodium
Why You Should Try This Soft Sourdough Sandwich Bread Recipe Today
Dive into the world of sourdough baking with our sourdough sandwich bread recipe—a gateway to becoming a more confident home baker. Whether you’re baking for a special occasion or just for the joy of it, the aroma of freshly baked bread is a reward in itself. Remember, every baker starts somewhere, and each loaf you bake is a step toward mastering the art of sourdough. Share your creations online, engage with fellow bakers, and keep perfecting your technique. Your next perfect loaf could be just one bake away! Happy baking!
Explore More Side Dish Recipes
Explore a delightful array of recipes tailored to your taste. From cherished classics to new favorites, there’s something for every occasion: